Wednesday, April 23, 2014

Mass Migration of DWG Files Using AutoCAD Electrical

imageOver the weekend I ran into a case where I had several thousand DWG files that were older than AutoCAD Release 14. Vault would not rename them because of this. Inventor’s Task Scheduler wouldn’t migrate them for some reason either. After a few other attempts to migrate, I was running out of options. Then I noticed AutoCAD Electrical on one of the workstations! I checked all of the files out to that workstation, and then used the Modify Symbol Library utility to basically do nothing more than save each DWG.


The Start button remains greyed out even after checking the “Do a SAVE even if no change” box. The dialog wants some actual work. So I had it Zoom Extents on each drawing and that satisfied the dialog. This ran extremely fast! Much faster that Inventor’s Task Scheduler would have. We ran through several thousand DWG’s in under 30 minutes! Of course this workstation is running on SSD’s but still…

image

Wednesday, March 26, 2014

Consistent Reporting in AutoCAD Electrical Using (.set) Settings Files

It can be a real pain setting up reports because the reported fields and formatting resets to default with each new report. I have seen users save a report as a template, and then insert the sheet into the project, as a way of controlling the reports format. However the following can be saved as a .set file and referenced on future reports.

  • The various include/exclude report options depending on report type
  • Display and grouping options
  • Predefined filters in the Location/Installation fields
  • Special break and header information
  • Predefine the output type
  • What fields are displayed and their order
  • The “Put on Drawing” options like column width, text color, layer to be used ,ect.

Like most other external files in AutoCAD Electrical, these are simply text files and as such could be edited using a simple text editor. However their format can be quite confusing. The Electrical dialogs for creating/editing these files is defiantly the way to go when creating or modifying saved report formats.

Saving Report Formats

Create these .set files using the Report Format Setup dialog. Its button is on the Reports tab. image The dialog is quite busy. Here is a quick breakdown of its features.
image

  1. Start here. Choose the type of report and all options on the right update.
  2. Review and select any report options. This area is mostly include/exclude and grouping type options.
  3. This section allows filtering by Installation and Location codes.
    1. For more information on the power of these codes see this post. INST & LOC Codes Honor Wildcards When Searching
  4. Options for type of report export, what fields are reported and in what order. To give an idea what what options are hidden behind the four buttons I have included screen shots of each.
    • Save Report to File
      image
    • Put on Drawing
      image
      also note the Column Width “Define” option…
                            image
    • Change Report Format
      Of course the fields available are determined by the type of report chosen. Also note the field name and justification can be modified here for each selected field.
      image
    • Sort Fields
      image
  5. Each report type can be broken into separate tables based on various fields such as location code, manufacture name, block filename, ect.
  6. This is where the options selected are finally saved into a settings file. Pressing Save Format File will prompt for imagea filename if not yet named. Open Format File will load all selected options after opening an existing .set file. And finally Save As Format File will prompt for a new name and not overwrite the loaded .set file. The loaded .set files name is displayed in the top right corner of the Report Format File Setup dialog.

    When opening settings files, only .set files for the currently selected report type are displayed. However when saving, all .set files are displayed to keep from overwriting any other setting files.

.SET File Default Location

The default location for the settings (.set) files is buried in a hidden folder under each users name.
C:\Users\swile\AppData\Roaming\Autodesk\AutoCAD Electrical 2014\R19.1\enu\Support\User\…

However this location can changed in the wd.env file on line (*WD_SET_FILES,x:/some path/,folder for report ".set" files) Remove the asterisk (*) from the front of the line and then replace the path with your own shared network path.

Referencing the Saved Report Settings

Now that a .set file has been created lets use it. Both the Schematic and Panel Reports dialogs have a Format button that allows selection of any .set file for the currently selected report type. If you are not seeing the .set file desired, double check that the correct report type is selected.
image

These settings files are also used with the Automatic Report Selection tool. I’ll try to cover that in a future post.

Saturday, March 1, 2014

My Working Vacation

I took a week and a half off this month. My vacation goal was to build an office desk/work bench. I had this idea in my head but really nothing on paper. I started on the Inventor model on Saturday last week and today finished the desk. I had no idea this project would involve so many people and I’m deeply grateful to all that helped. Technically this desk is not 100% complete. I have a good bit of sanding and painting on the routered grooves left to do. However I was so excited by the final results I had to share them.

My original conceptual drawings. The little end table picture was from the letters section of an American Woodworker magazine. Sorry I can’t find the magazine it came from anymore, so I can’t give credits for the picture.
201405260931
201405260931

Final Inventor Print..
Office Work Bench

Finished design (before paint) The plan is to have the grooves the same color green as the walls.
2014-03-01 18.03.42

2014-03-01 20.51.53

Before more pictures, I would like to give a huge thank you to my parents for helping transfer and the pieces from OH to SC and for all the help assembling once it was home. Also a huge huge shout out to Dean and Wayne at Wengerd Wood for all the routing and CNC programing time.

Production Photos

Three sheets of 3/4 inch cherry veneer MDF coming home from the finishers. We bought the wood from Kiem Lumber but I can’t remember the name of the finisher.
2014-02-26 09.17.10

First sheet on the router. I must say, I was a bit nervous as the bit first cut into it.
2014-02-26 13.18.53

Tabletop and middle front just about finished.
2014-02-26 19.49.24

The grooves vary from 1/8th to nearly 3/4 inch deep.
2014-02-26 18.59.27

All the parts finished ready to be wrapped up to head to SC.
2014-02-27 12.14.47

3/27/14 Update
I have 99% of the sanding and smoothing complete now. Just about ready to paint.
201403182305
2014-03-26 21.43.39

5-16-14 Update
On all of the front edges, we extended the cuts an extra inch and then cut a 90 deg. V from the back side all the way through. The little triangle that was left we folded over and glued and nailed into place. I spent a good bit of time manually recreating a few of the knobs that broke off when creating the folds for the front edges.
image  image
That extra work is what makes the transitions look so seamless.
I started priming the grooves yesterday. This first drawer took about an hour. Sad smile I know, I said the grooves will be a very light green… But, man does that white pop! I have a feeling a final coat of high gloss white will be the finishing touch to this desk. The good thing is I will be able to see what white will look like once the primer coat is completed. It may end up being too much white for the room?
2014-05-15 22.54.46
2014-05-16 08.20.05

5-26-14 Update
I spent a large part of Saturday and a few hours Sunday night painting again. You can’t see it in the pictures below but I painted behind the drawers as well.
2014-05-26 00.49.39

6-1-14 Update
I updated/finished the 3D model
No background

Office Work Bench Exploded

6-13-14 Update
I have finished sanding the primer and will start painting this weekend. The white will stay!. I am going with a high gloss white.
I posted the model to GrabCAD… https://grabcad.com/library/my-hobby-work-bench-1 
201406081739

Monday, February 3, 2014

Overview of Reports in AutoCAD Electrical

There are three types of reports in AutoCAD Electrical. Schematic, Panel, and the Drawing List report.
image        image
Schematic reports only pull values from schematic symbols on the drawings in the project. Panel reports only pull values from the panel footprints. However the Panel report has an option (Full) that will include all values from ALL components. The Drawing List report uses the data stored in the project descriptions and drawing properties. Of course a few other types could be added to the list if the audits and export options were included.

Reports are broken down into the following categories. Each of the categories come with their own options, sorting, and reportable properties list.
image    image

The Basics

All of the reports allow project wide as well as active drawing wide reporting. Project wide isn't necessarily all drawings. A separate drawing selection dialog opens to allow selection of individual drawings as needed. Most of the reports also have an option for a manual selection (pick) of components to report on.
image

  • Note: If “Active drawing” is not available it is more than likely because the drawing is not a part of the active project. Any Project report, in this case, will be from the active project and NOT the project the active drawing is from.

Filtering by Installation or Location Code can further limit the components being reported on. This filtering is far more powerful than single values. See the blog post about wild cards to see how to include/exclude multiple values.
       INST & LOC Codes Honor Wildcards When Searching
image

Typically there are a number of report type specific options in the middle of the Reports dialog.
image

All of the report types have a Format button. image Pressing this button opens a new dialog that allows the user to select a report settings (.set) file. The .set files store formatting and selection options. These are created from the Report Format Setup command.
image

The Report Generator
image

The Report Generator shows a preview of what records will be reported and what data about each record will be included. Here header information can be added, sorting and grouping can take place, and columns can be added or removed from the table. The User Post button allows scripts to run on the data. Typically there are one or two scripts already provided under User Post for the different types of reports.

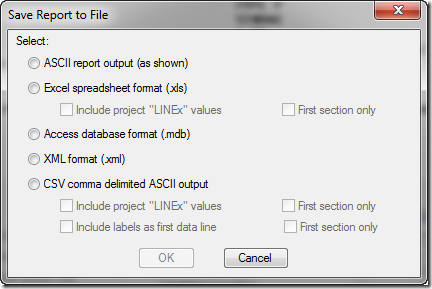
Finally either Put on Drawing or Save to File is pressed. Put on Drawing brings up a table wizard that allows control of the report table formatting. Save to File gives the following file types as exports.
image

Updating Existing Reports

Currently reports are not updated automatically as changes are made to the schematic. Simply rerun the report and then choose Place on Drawing. If that report was already placed somewhere in the project, the Table Generation Setup will default to Update Existing. Simply press OK and any changes will update in the existing table.
image

When saving the report out to a file, saving a new report export can save over the old export. (Electrical will prompt stating a file will be overwrote) Just be aware of this because any changes made to the original export will be lost as the new file completely saves over it.

I have several unique report configuration requests that will follow this post.

Friday, January 10, 2014

MyACADE’s 2013’s Blog Stat’s

I’m not sure if its me being an engineer, or me being a true nerd, but for some reason I’m fascinated by the stats that can be created from a webpage. Below are a few interesting things about this blog from last year. All statistics are shown for the year 2013 only.

Total blog (not page) visits: 8,309
Directly entered web address (not referred): 29.10%
From a search engine (Bing, Google, ect): 21.87%
Mobile and tablet traffic: 4.39%

Visits grouped by browser:
image

Number of new posts: 37
My official (posted) goal was 24 posts for last year. My personal goal was 52. I’m not sure if 37 is a win or not.

Most active blog post: AutoCAD Electrical 2013 New Features! (2,210 Views)
Breaking The wd.env File Down Line By Line (908 Views)
Wire From/To Annotation On the Schematic (694 Views)
Creating a custom PLC style (620 Views)
Title Block Update - Previous / Next Sheet Numbers (604 Views)

Number of new people I have personally met because this blog: 2

Number of pages viewed per blog visit:
image

Average time (in minutes) spent per page visited:
image

Visits by location:
image

Top ten locations:
image

Percent of new viewers vs returning viewers: 54.36% New on Average
image

This years visits per day
The dips are weekends.
image

I hope you enjoyed this useless information. I have a series of reporting posts in the works.